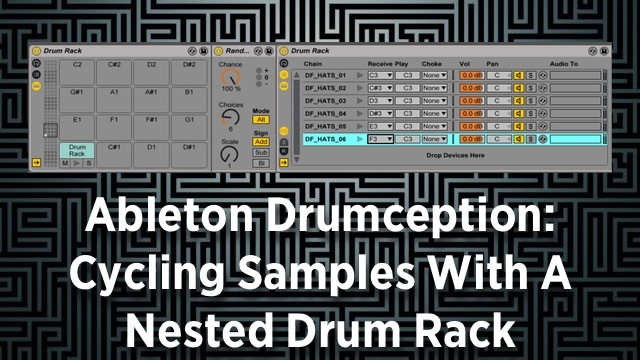
Ableton Drumception: Cycling Samples With A Nested Drum Rack via DJ TechTools
Sometimes there’s just not enough sounds available in a basic Ableton drum rack to allow for the full versatility a live performer might want. In today’s article, guest contributor and soundpack designer (from the DJTT newsletter!) Apoth shares the secrets behind nested drum racks, or what he likes to call DRUMCEPTION!

DRUMCEPTION is using the “Random” midi effect with a nested drum rack inside of a drum rack cell. This allows performers to load multiple samples into a single drum rack cell and trigger a new sample every time they trigger that pad/cell. This allows the performer to achieve more playability possible than with a single cell/sample.
Why not just use a pre-recorded sample?
There are a few problems with a pre-recorded sample:
Unable to modify any synth parameters in real time (frustrating!)
Anything with filtering, effects, or detune had to be programmed in.
Samples in the “Simpler” instrument become tempo-locked.
A nested drum rack allows for more flexibility over the sound since it relies on samples and MIDI rather than rendered audio. The possibilities with this are nearly endless.
DRUMCEPTION: Basic Principles
The whole idea behind Drumception is that it’s like a bunch of soundpacks compressed into one. The real challenge with drum racks is having a lot of different sonic ideas, and only 16 pads to fit them in. While DJs could use 32 pads, or even 64 pads, sometimes it’s better to keep things simple, accessible, and fun to play with.
So how do we put multiple layers of drum triggers on one pad? Enter the “Random” midi effect. The Random midi effect has a mode setting that switches between Random and Alternating. If it’s at 100%, it always switches to the next MIDI choice. When the Random midi effect is placed before a drum rack chain, it will cycle through samples in the chain.
This technique is used heavily in ill.Gates soundpacks and performances.
How To Setup Drum Racks for DRUMCEPTION
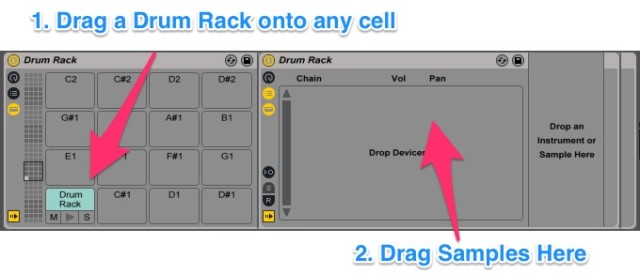
Find source material (or make it) – this can be chord samples, drum samples, vocal one shots etc. Drop a new drum rack onto an existing drum rack cell. Drag your samples onto the drum rack in the order you want them to play (this isn’t entirely necessary but makes things easier in the long run)
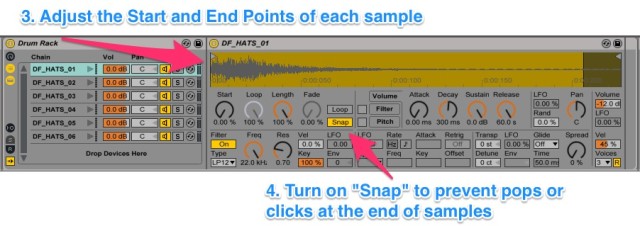
Trim up each one of the samples in the Simpler (check for zero crossings – this will help avoid pops/clicks at the end of samples) and then adjust the ADSR appropriately (sometimes I will add macros for this so I can change all the samples at once).
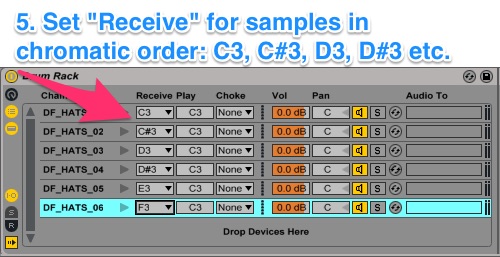
Open the I/O panel of the drum rack, and then set up the chains so that they are in chromatic order (C, C#, D, D#, etc.). You should also take care of any choking (to prevent samples/sounds from overlapping) at this point too.
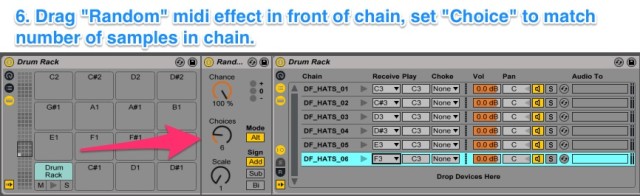
Drop a Random device in front of the drum rack and set it according to how many samples you want it to cycle through. For this application the chance should always be set to 100%. Choices should equal the number of samples in your nested drum rack, and the Mode should be set to ALT (there are other more complicated things you can do with different settings but let’s keep it simple for now!)
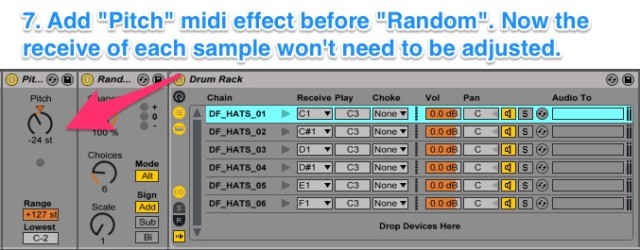
Double check all I/O settings again at this point. Sometimes if you paste chains into the nested drum rack from a different channel, the ‘Received’ note of the pad with the nested rack in it will get changed to ‘All’. Make sure that it’s on the correct note for the pad you want, then check and make sure the received notes in the nested drum rack start with C3. If you’re like me, sometimes you don’t want to change each chain to C3 from the default C1. In this case, drop a Pitch midi effect in front of the nested drum rack (after the Random and any other Midi effect) and set it to -24 semitones. This will make sure that the C3 note the cell receives gets bumped down to C1.
The Moment Of Truth! Press that button and make sure all the chains in the nested drum rack get played. If you hear unintentional silence on any of the chains, go back and make sure everything is setup correctly – otherwise, enjoy!
Again, this is just one way to use this technique. It can be used in so many other ways to achieve great sounds and help you create dynamic soundpacks for live performance.
1. You cannot copy/cut and paste a normal drum rack (one with the grid displayed) into a cell of another normal drum rack when using this technique. Ableton will crash every time you try. You can only paste the chains from another rack.
2. Your inputs must match your outputs! A lot of the time when I was working on this concept I would set everything up and then press the button… and hear nothing. Occasionally I would forget to make sure that everything in the MIDI signal chain was sending the correct notes. Basically, the drum rack takes in different notes, and then plays C3 as its output. This is all fine and good if you have the drum-cell filled with a simpler that can accept any note, but if you’re trying to trigger a complex chain of simplers in another drum rack, if the first in the chain isn’t set to receive C3, you’re getting nothing.
3. Choking: the whole reason that I converted from using an Instrument Rack in this setup, to a nested Drum Rack, was so that I could choke the different chains however I wanted. You don’t really lose THAT much functionality over an instrument rack when you’re dealing with samples, but it does make a difference which you choose. Also, with a Drum Rack, you still get access to internal sends!
What up fam, hopefully this is some helpful tips for those that use Ableton a lot. I will continue to post all of these dope DJ tips for your pleasure. Deuces.